As of April 2012, there were already 42 million Facebook Pages and 9 million apps and websites integrated with Facebook. I think that’s pretty clear how Facebook is growing beyond our comprehension. So why don’t we look at how to customize your Facebook Page in 4 Easy Steps and make it your own!
It’s also evident that most bloggers have now flocked on Facebook to create further connection with their audience, build blogging communities, or simply let their presence be known to the rest of the 901 million monthly active users.
Traffic wise, Facebook has contributed to my blog, although not too dramatic since I’ve only just started getting active there end of last year. But, you can’t ignore the clicks generated from Facebook, so I thought, if we’re going to use Facebook, let’s use it right, right? And let’s start with the little things that we can tweak on our Facebook Page.
This next tutorial is an easy-peasy one and will show you how to ‘make your Facebook Page‘ look like your blog’s second home.
And while we’re at this – let’s kill two birds with one stone: how to customize your page and ways of adding more apps!
Let’s go for a visual tutorial rather than me rambling all along. 🙂
Customize Your Facebook Page in 4 Easy Steps!
Example: My Facebook Fan Page is: https://www.facebook.com/Sweetjellybean5
1. Get to know your tabs/apps!
![]()
Screenshot of my Facebook Page and where the orange arrow is pointing, you need to click that to see the rest of your tabs/apps.
2. What tabs/apps do you have?
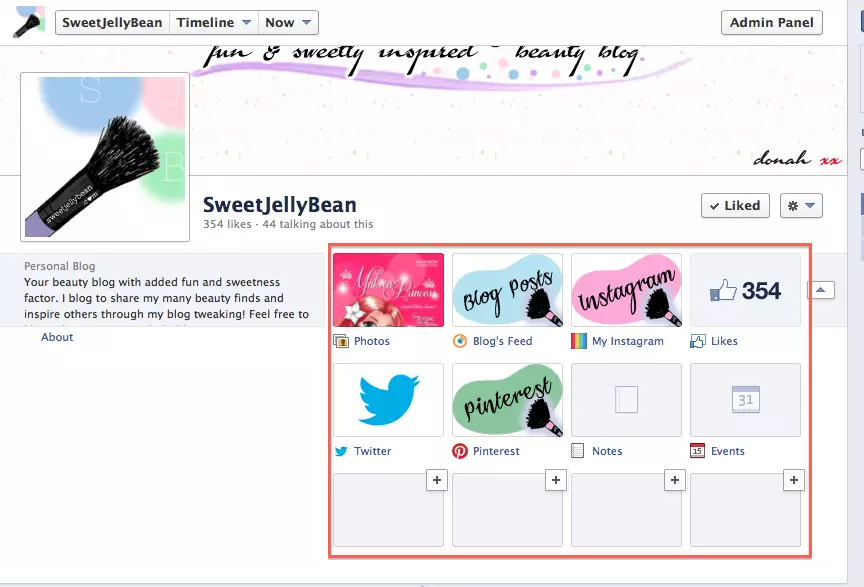
My tabs on my Facebook Page.
Note: The only tab you cannot customize or swap position here is Photos. The rest, you will see a drop down menu (shown in next step) where you have the options to do so.
3. Edit, Swap, Customize Options
If you hover on one of the tabs, say Instagram as an example, the ‘pen’ icon will appear as shown below, where you can click and you will see the drop-down menu with the options applicable.
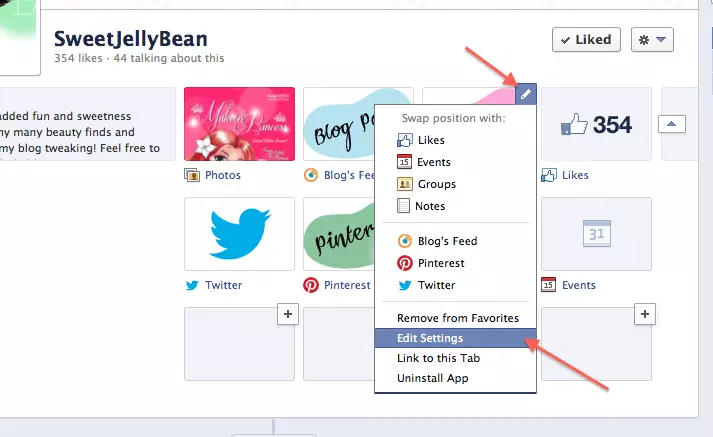
4. Customize your App
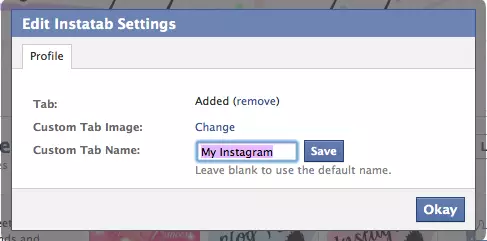
Most apps have their default image, just like Twitter, Instagram or Pinterest etc.. – but if you’d rather change it for that personal touch, like mine, then you can do so. It doesn’t take forever and it’s an easy as clicking Edit Settings… the pic shown below will pop up, and then go merry and change them!
Don’t forget to click Okay!
You can upload a JPG, GIF, or PNG file. The size of the image must be 111 x 74 pixels. File size limit 5 MB. If your upload does not work try a smaller picture. (check out end of this post for sample images you can use or tips on where to do them 😉 )
Here are some of the Custom Tab Images I made via Pixlr Express and PicMonkey in just minutes. As you can see, I like the design to be consistent – and although I thought it’d be hard doing so with Pixlr Express or PicMonkey, it was actually fun to do! Feel free to use the ones below and just link up to this post or have fun and be creative! Give me a nudge if you’d like a quick tutorial, I’ll be happy to do so. 🙂


Add More Apps in 4 Steps! – Shortcut Version!
…and the longer one?
This is the shortcut version (as I call it) but there’s another version of adding apps as well, of which you will see below.
Note: Sometimes it can be confusing to find the right app when searching for it, so there’s another way of installing it on your page using just one application to start of. Check it out:
Let’s use Twitter for instance: Click the Twitter Page App as shown below.
-Step 1-
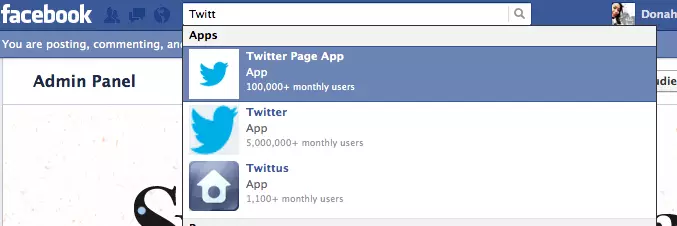
-Step 2-

-Step 3-
Now check your Facebook Page and Click Twitter – once you have everything set ie. username etc, you should see the screenshot on Step 4.

-Step 4-
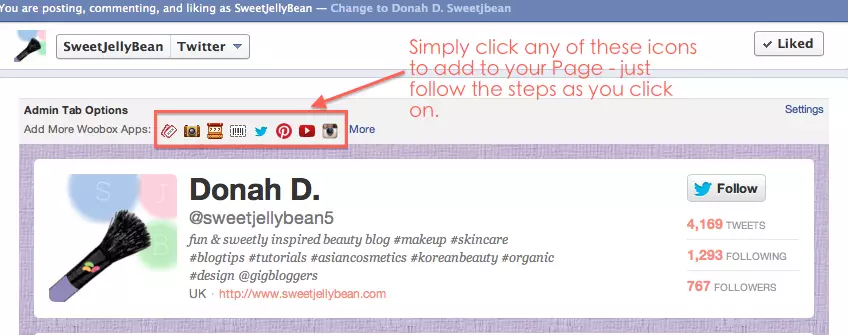
Now, if you haven’t done so, try it for yourself and add Instagram or Pinterest by clicking the icons and just follow the steps.
See how easy it is to add Pinterest, Instagram, Youtube and another channels without having to research for the right app on Facebook?
Alternatively…
…if the apps you like are not found here, you can certainly do the ‘longer version’ as shown below.
Note: To add your ‘blog’s feed’ simply click NetworkedBlogs App and follow the steps below.
a. Simply search for that app as shown below, and click the appropriate page for it.

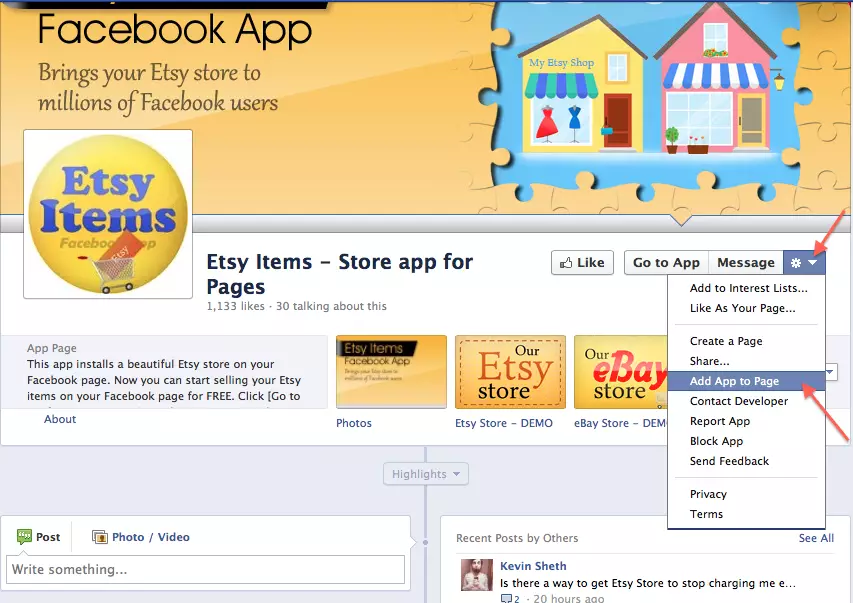
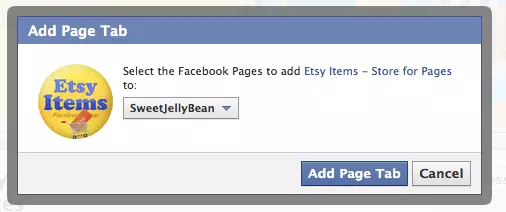
b. Select the page you’d like the app to be added. For users with multiple pages, you will see a drop down menu where you can select the page you prefer Etsy to appear.
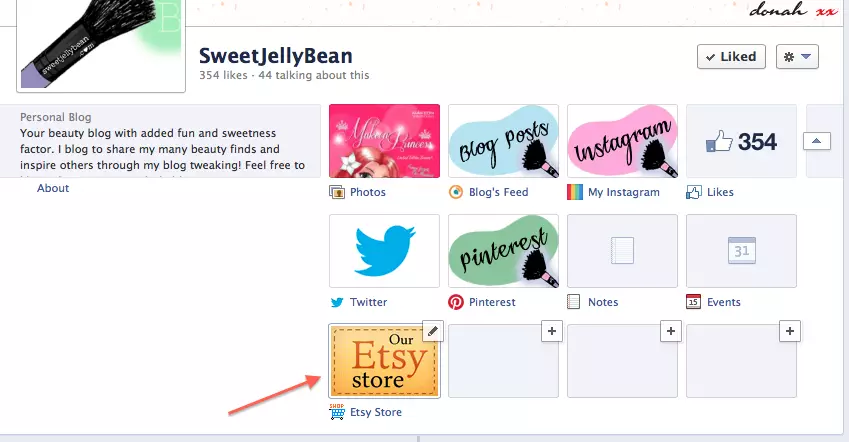
And voila! You have Etsy on your Facebook Page! You can now connect your Etsy Shop here and share with your followers.
Feel free to let me know what you think of this tutorial or any questions you may have. I’d be more than happy to help.
Have fun!
Related Article
- Hate dealing with HTML codes, but want to make your own blog button grab code for you blog? Then check out my easy-to-follow steps on generating your grab code here.
